In this tutorial, you'll learn how to take your phone footage from amateur to cinematic using DaVinci Resolve's powerful color grading tools. Whether you're shooting with an iPhone, Samsung Galaxy, or any other smartphone, this tutorial will show you how to make your footage look like it was shot with a professional camera.
First, I'll cover the basics of color grading, including how to use the color wheels and scopes to adjust the exposure, contrast, and color balance of your footage. Then, we'll move on to more advanced techniques like creating a cinematic depth of field and adding film grain to give your footage a more organic look.
Watch my full guide to DaVinci Resolve Optimization Here: https://www.youtube.com/watch?v=fqR2vxi-i_A
Throughout the tutorial, you'll see how to apply these techniques to real-world examples of phone footage, and you'll learn how to troubleshoot common issues like noise and color banding.
Whether you're a beginner or a seasoned pro, this tutorial is packed with tips and tricks to help you take your phone footage to the next level. So grab your phone, fire up DaVinci Resolve, and let's get started!
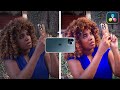
Transforming ordinary phone footage into a cinematic masterpiece in DaVinci Resolve is an exciting process. To begin, head to the Color page and open the waveform for better color adjustments. Label your nodes for clarity; for instance, label the first node as "Primary" for adjustments using the primary color wheels.
Select a key frame, often referred to as the hero image, to focus on your main subject while tweaking color parameters. Use the lift, gamma, and gain controls to fine-tune brightness and contrast. Add a new node for "Curves/Stats," resembling adjustments in Lightroom. Play with curves to enhance highlights and shadows, bringing a refined touch to your image.
Further, add a node for "Color Isolation" using the color warper tool to enhance specific colors. Isolate and tweak skin tones separately for a more polished look. Utilize the face refinement feature to retouch specific facial features, offering advanced adjustments to eyes, lips, and skin.
Create depth of field and bokeh effects by adding a depth map and applying lens blur. This adds a realistic touch of focus and blur to your image, enhancing its cinematic feel. For added realism, include lens reflections and subtle halation effects. Experiment with settings to find the right balance of effects.
To guide the viewer's focus, introduce a vignette by adding a circular window and adjusting its size and softness. Employ an outside node to brighten the central area, making your subject stand out. Introduce anamorphic lens flare and film grain effects for texture and authenticity.
Finish by adding cinematic crop bars through the Output settings for that widescreen look. The result is a cinematic transformation, showcasing the powerful capabilities of DaVinci Resolve's color grading and effects features. Feel free to experiment with different looks and let your creativity shine through in each project.