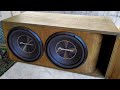
Please excuse the work quality on this one since it was my first attempt to curved a plywood for a car subwoofer enclosure. Didn't selected the best quality plywood since everywhere is on the lockdown and was just getting the readily-available plywood somewhere near. I almost fail to purchase finishing products too, thankfully there are still a few open paint shops around town.
Without a further ado, here is the project timeline details:
00:00 - TinkerCad layout and design link https://www.tinkercad.com/things/be1u8CbACZI
00:10 - TSP calculation on Bass Box Pro 6.
00:30 - Cutting down plywood sheet to size.
00:50 - Drilling pocket holes for securing top panel using wood screws. Pocket hole drilling make screw heads invisible.
01:25 - Gluing all cut panels. Secure top panel by screwing down through pocket holes.
01:55 - Laying out kerf cut sizes and measuring kerf radius.
02:20 - Gluing down double front baffle.
02:40 - Cutting subwoofer mounting holes on the double front baffle.
03:05 - Gluing and nailing down corner braces.
03:25 - Routing port edges to ensure smooth air movement.
04:45 - Drilling pilot holes for the screws on the underside of the box.
05:00 - Countersink drill bit and do all the pilot holes to sink the screw heads. This will prevent the metal screw heads from scratching anything on its path.
05:20 - Using a roundover router bit to round the box edges to give it a smooth look and feel.
05:30 - Sanding and finishing using 3 sandpaper grits 80, 120, and 240.
06:00 - Cutting a square hole for speaker terminal cup with spring loaded posts.
06:20 - I used dark walnut stain on the plywood. Applied using an ordinary paint brush.
06:35 - Wipe off excess stain with a cloth.
06:45 - Then finally, apply thin coats of clear gloss lacquer.
06:55 - Assemble all electronics and hardware.
07:00 - I used a welding magnet as guide for perpendicular drilling of the subwoofer mounting holes.
07:15 - Wrap all soldered joints with heat shrink tubing.
07:40 - Stick the rubber tape seal on the subwoofer mounting rim to prevent any air leaks.
07:45 - And lastly, wire all subwoofers to parallel to get the most output power off the amplifier and bolt it down to oblivion!
08:05 - Optional step: Stick felt foot pads under the box to prevent any scratches on whatever the subwoofer enclosure is dragged.
08:20 - Final product showcase.
That's it. Final DC resistance of the system is 1.5 Ohm. I will show you the actual system impedance and tuning on the next upload. Also will do a series of bass test on this beauty on the next upload. I hope you all enjoy this another DIY video and I hope you are all doing well.
STAY AT HOME AND BE EXCELLENT!