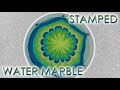
Today I'll show you how to stamp a water marble instead of dipping into the cup. ▼All products used linked below!▼
See more water marble nail art tutorials: http://goo.gl/DPpKba
Subscribe for new videos every week: http://goo.gl/JJaoHC
►Nail polish and products used◄
-Unt -Ready for Takeoff Peelable Base Coat: http://amzn.to/1KDOmFv
-OPI - Silver Canvas: http://amzn.to/1PGSq3s
-OPI - Primarily Yellow: http://amzn.to/1onv6l9
-OPI - Landscape Artist: http://amzn.to/1PGSiB1
-OPI - Turquoise Aesthetic: http://amzn.to/1UE0VVo
-OPI - Indigo Motif: http://amzn.to/1SohttS
-Yellow Stopper: http://amzn.to/2BaF2Kq
-Seche Vite Fast Dry Top Coat: http://amzn.to/1K9HQUE
-5 oz paper cup: http://amzn.to/1MFYfk5
-Room temperature filtered water (I get mine from a Brita pitcher: http://amzn.to/2CXebNV )
-Orange stick: http://amzn.to/1U20nmV (or your choice of sharp tool)
-(Optional) Simply Peel: http://amzn.to/1JWCNsM or Liquid Latex: http://amzn.to/1JsI9JL or Tape: http://amzn.to/1MFXQyc
-(Optional) Tweezers: http://amzn.to/2375kRC (slanted) or http://amzn.to/1Y533TL (pointed)
-Bliss Kiss Clear Stamper: http://amzn.to/2qQUuBx
-Dotting Tool: http://amzn.to/1LhZkAl
-Small Nail Art Brush: http://amzn.to/1LhZkAl
-Q-tips cotton swabs: http://amzn.to/2c0WkJ1
-Cleanup brush: http://amzn.to/1P0lvH9
-Clean up with acetone: http://amzn.to/1TlzxtI
►Step-by-Step◄
-Start out with clean, dry nails and apply your base coat
-Apply silver as your base color
-(Optional) Protect around your nails with Simply Peel or your choice of barrier
-(Optional) Apply a coat of yellow stopper for stickiness
-In your cup of water, create your bullseye, then draw in your design
-Dip your stamper into the cup like you would a nail, and clean up around the edges, then pull the stamper out
-(Optional) carefully split the design on the stamp head with a dotting tool, and remove the polish from the rim of the stamper
-Allow the design to dry slightly, then stamp onto your nails
-Use a brush dipped in polish remover to break the design at the sides, then remove protection if used and finish cleaning up around the edges
-Finish with top coat!
♫ Music is: Uwritten Return by Kevin MacLeod (incompetech.com) Licensed under Creative Commons: By Attribution 3.0 License http://creativecommons.org/licenses/by/3.0/ ♫
►Equipment Details◄
I record tutorials with a Canon PowerShot ELPH 510 HS: http://amzn.to/1POIjwt
Vlogging/Faceshots with a Logitech Webcam C310: http://amzn.to/1Wz7Tsg
For lighting I use a 14" LED Neewer ring light from this kit: http://amzn.to/2EOHDeN
With the flexible tube (also sold separately): http://amzn.to/2BP0wLS
On a desk stand: http://amzn.to/2CJUVDd
I edit with Windows Movie Maker: http://windows.microsoft.com/en-us/windows/movie-maker
Adobe Premiere Elements: http://amzn.to/1POJ60q
And Adobe Photoshop (thumbnails): http://amzn.to/1mK3aIg
►Check me out on these sites too!◄
FACEBOOK: http://goo.gl/Z89gjW
INSTAGRAM: http://goo.gl/1jqT8E
TWITTER: https://goo.gl/xYxLKM
PINTEREST: http://goo.gl/PeOOed
BLOG: http://goo.gl/DXTHPo
TWITCH: http://goo.gl/nzrzGM
►Main YouTube Links◄
My Channel: http://goo.gl/Lqr3Fo
Tips & Tricks Playlist: http://goo.gl/X6P7Gr
Water Marble Tutorials Playlist: http://goo.gl/DPpKba
Nail Art Tutorials Playlist: http://goo.gl/zmNZWJ
My Vlog Channel: http://goo.gl/qwOCJo
★Disclaimer: Some links above are affiliate links